Guide to Laptop Cooling Systems: Heatsinks, Vapor Chambers, Fans, etc
This is the the first part of the Laptop Cooling Systems series post. This part will go over the computer jargon and the mechanisms used in cooling systems. Everything here will be explained in layman terms so that the average Joe can understand all the jargon on youtube reviews, amazon reviews, this website reviews, etc.
1. Heatsinks
A heat sink is a metal component placed on top of a laptop’s processor (CPU or GPU) to absorb and spread heat away from these parts. Think of it like a sponge for heat—it soaks up heat from the processor and spreads it over a larger area, making it easier to cool down.
This is done through thermal conductivity which refers to the material’s ability to conduct heat (e.g., metals like copper and aluminum have high thermal conductivity, making them ideal for heatsinks).
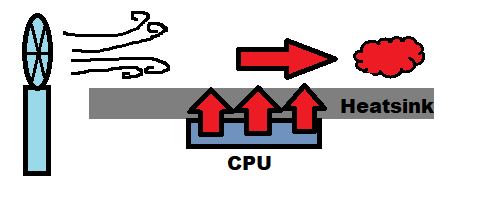
What’s the difference between the two?
Just the material.
5. Fan Systems
Dual or triple fans simply means two or three fans used as part of the cooling set up. Each fan often cools different parts of the laptop, like one focusing on the CPU and the other on the GPU. This setup ensures that both components get dedicated cooling without relying on a single fan to handle all the heat.
5.1 Dual Fan Systems
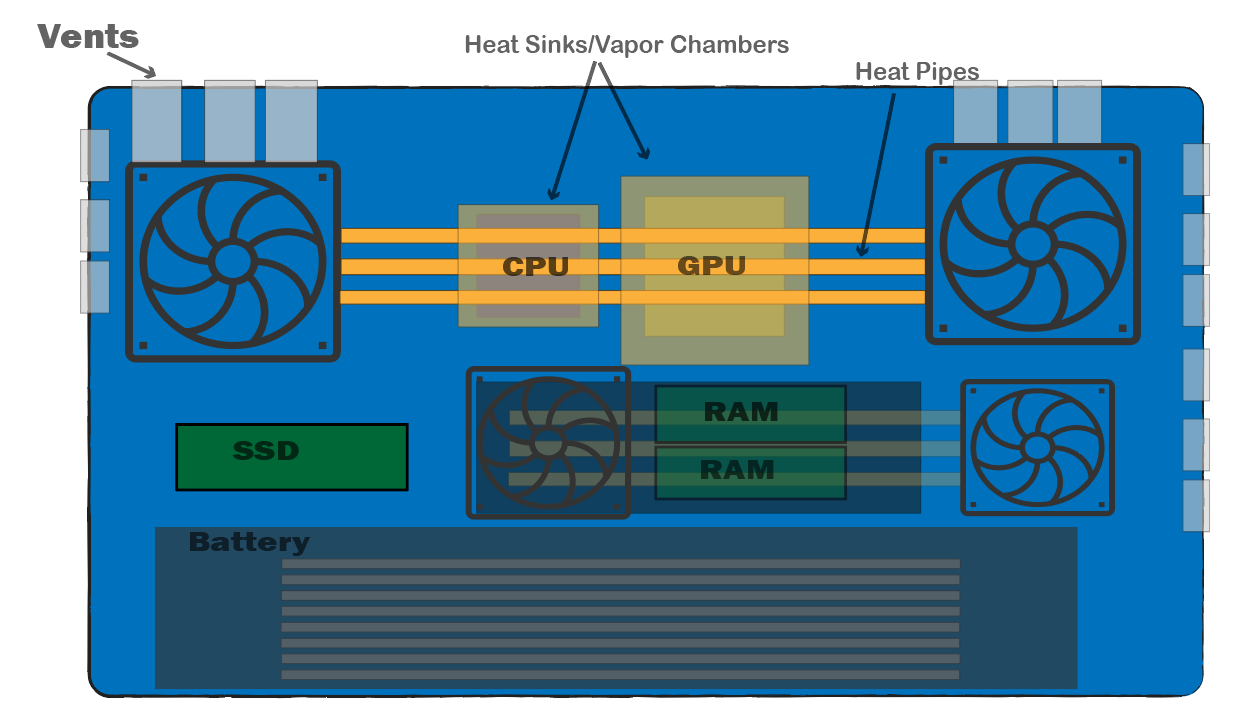
One reserved for the CPU and the other reserved for the GPU placed as shown in the figure.
5.2 Three Fan Systems
The first two fans are usually placed as shown in the figure as well. The third fan can be placed in several spots, depending on the laptop design.
- Central Placement: The most common placement is between the CPU and GPU to cool both components by helping with overall airflow or to target specific areas like VRMs and RAM.
- Side Placement: In some models, this fan is placed on the side to assist (see figure above) with cooling additional components such as VRMs (voltage regulators) or the motherboard itself.
- Shared Exhaust: Sometimes it shares an exhaust path with the CPU or GPU fans, adding airflow to help remove heat from the entire system.
6. Vent Placement
Vent placement in a laptop plays a CRUCIAL role in making an efficient cooling system.
Vents are placed to separate intake and exhaust areas. In the sketch I made above, they’re the gray colored rectangle shaped objects.
Cool air typically enters from the bottom or sides, while hot air is exhausted through the rear or sides. :
Now…ideally a laptop should have as many vents as possible however this isn’t always practical. For example, a small thin laptop may not need as many vents as much as a gaming laptop. Having too many vents on thin small laptops can jeopardize the chasis resistance to shock as well as being more prone to accumulating dust.
Rear Vents: In high performance laptops, larger and more vents are used to ensure maximum airflow, while rear vents direct heat away from the user. Comming in gaming and high-performance laptops, as rear vents direct heat away from the user, especially during long sessions.
Side Vents: Positioned on the sides of the laptop, often near the CPU or GPU, side vents help exhaust hot air directly out of the laptop’s sides.
Bottom Vents: Bottom vents allow cool air to enter the laptop, often working with rear or side vents to create a full cooling cycle. Comming on thin and portable laptops (MacBooks). However, they can be obstructed if the laptop is placed on a soft surface, like a bed or lap.
6.1 Gaming Laptop Vents
Ideally, a high-end gaming laptop vent configuration should be something like this:
- Rear Exhaust Vents: 1-2 vents for efficient hot air expulsion.
- Side Exhaust Vents: 1 on each side, aiding in heat removal.
- Bottom Intake Vents: Primary source for drawing in cool air.
- Optional Front Intake Vents: Can enhance cooling but should be carefully positioned.
6.2 UltraBooks Vents
Since ultrabooks prioritize portability and often don’t handle as intense workloads as gaming laptops, their cooling design is more compact and less aggressive.
- Exhaust Vents: Typically, 1-2 exhaust vents (primarily at the rear) are sufficient for ultrabooks, as they usually generate less heat than high-performance laptops.
- Intake Vents: Bottom vents are often the main source for cool air intake. One or two intake areas are generally adequate.
7. Example: Gaming Laptop Cooling System
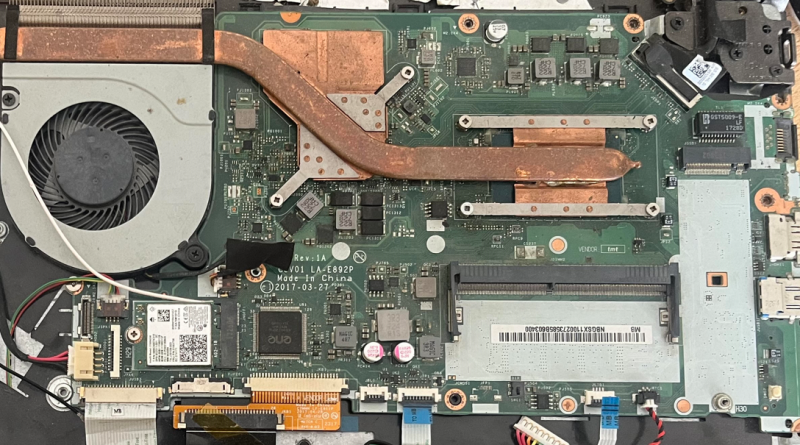
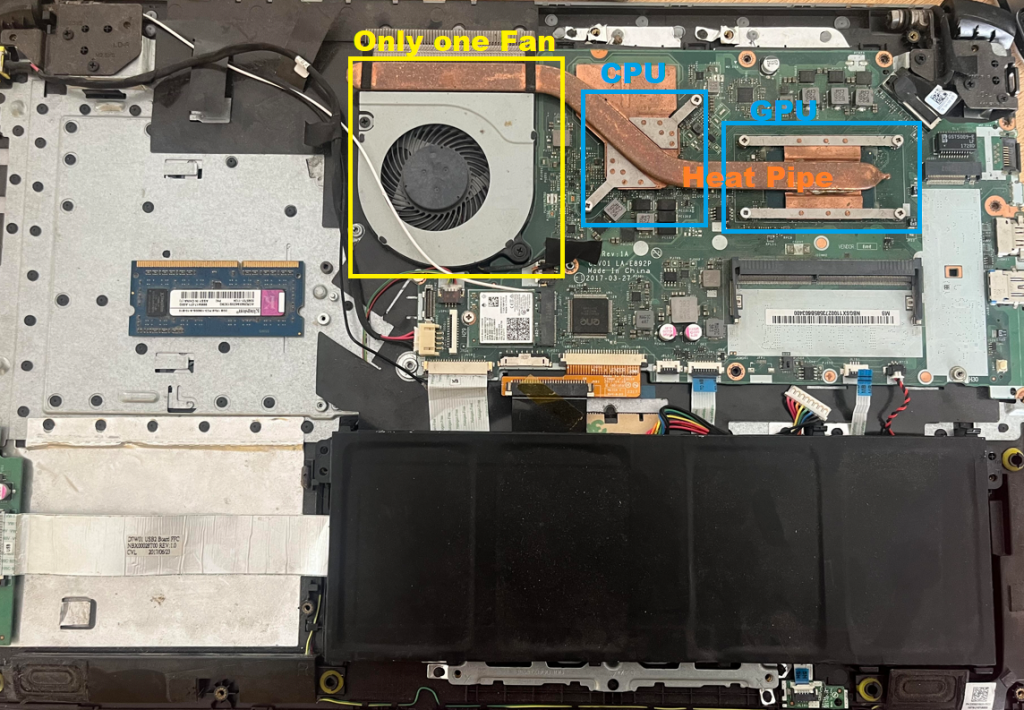
The laptop below runs on a Core i5 8250U and a MX450. Notice that there is only ONE FAN in the entire cooling syste, There’s only ONE HEAT PIPE and the heat sinks/vapor chambers sit on top of the CPU/GPU.
This laptop only lasted me ONE year. It died in the heat of summer. Partly my fault but also the cooling system was not efficient. There should be at least TWO fans each dedicated to the GPU and CPU. Also one heat pipe (this reduces surface area for cooling) is not ideal.
Lastly, the vents on this laptop was also a problem:
- Only rear side vents/no side vents.
When Buying a laptop off this website or any website, it’s always a good idea to check the vents just by looking at the laptop chasis as well. If it’s a gaming laptop, there should be several on all sides.
Author Profile
- I am physicist and electrical engineer. My knowledge in computer software and hardware stems for my years spent doing research in optics and photonics devices and running simulations through various programming languages. My goal was to work for the quantum computing research team at IBM but Im now working with Astrophysical Simulations through Python. Most of the science related posts are written by me, the rest have different authors but I edited the final versions to fit the site's format.
Latest entries
 wowDecember 18, 20255 Best Laptops For World of Warcraft – Midnight & Classic (2026)
 LaptopsDecember 17, 2025The 4 Best Laptops For Virtualization of 2026 (10-50 VMs ATSM)
 Hardware GuideDecember 17, 20252026 Beginner Guide to Reading Computer (Laptop) Specifications
 LaptopsJune 30, 2025Best Laptops for Computer Science (July 2025 )
